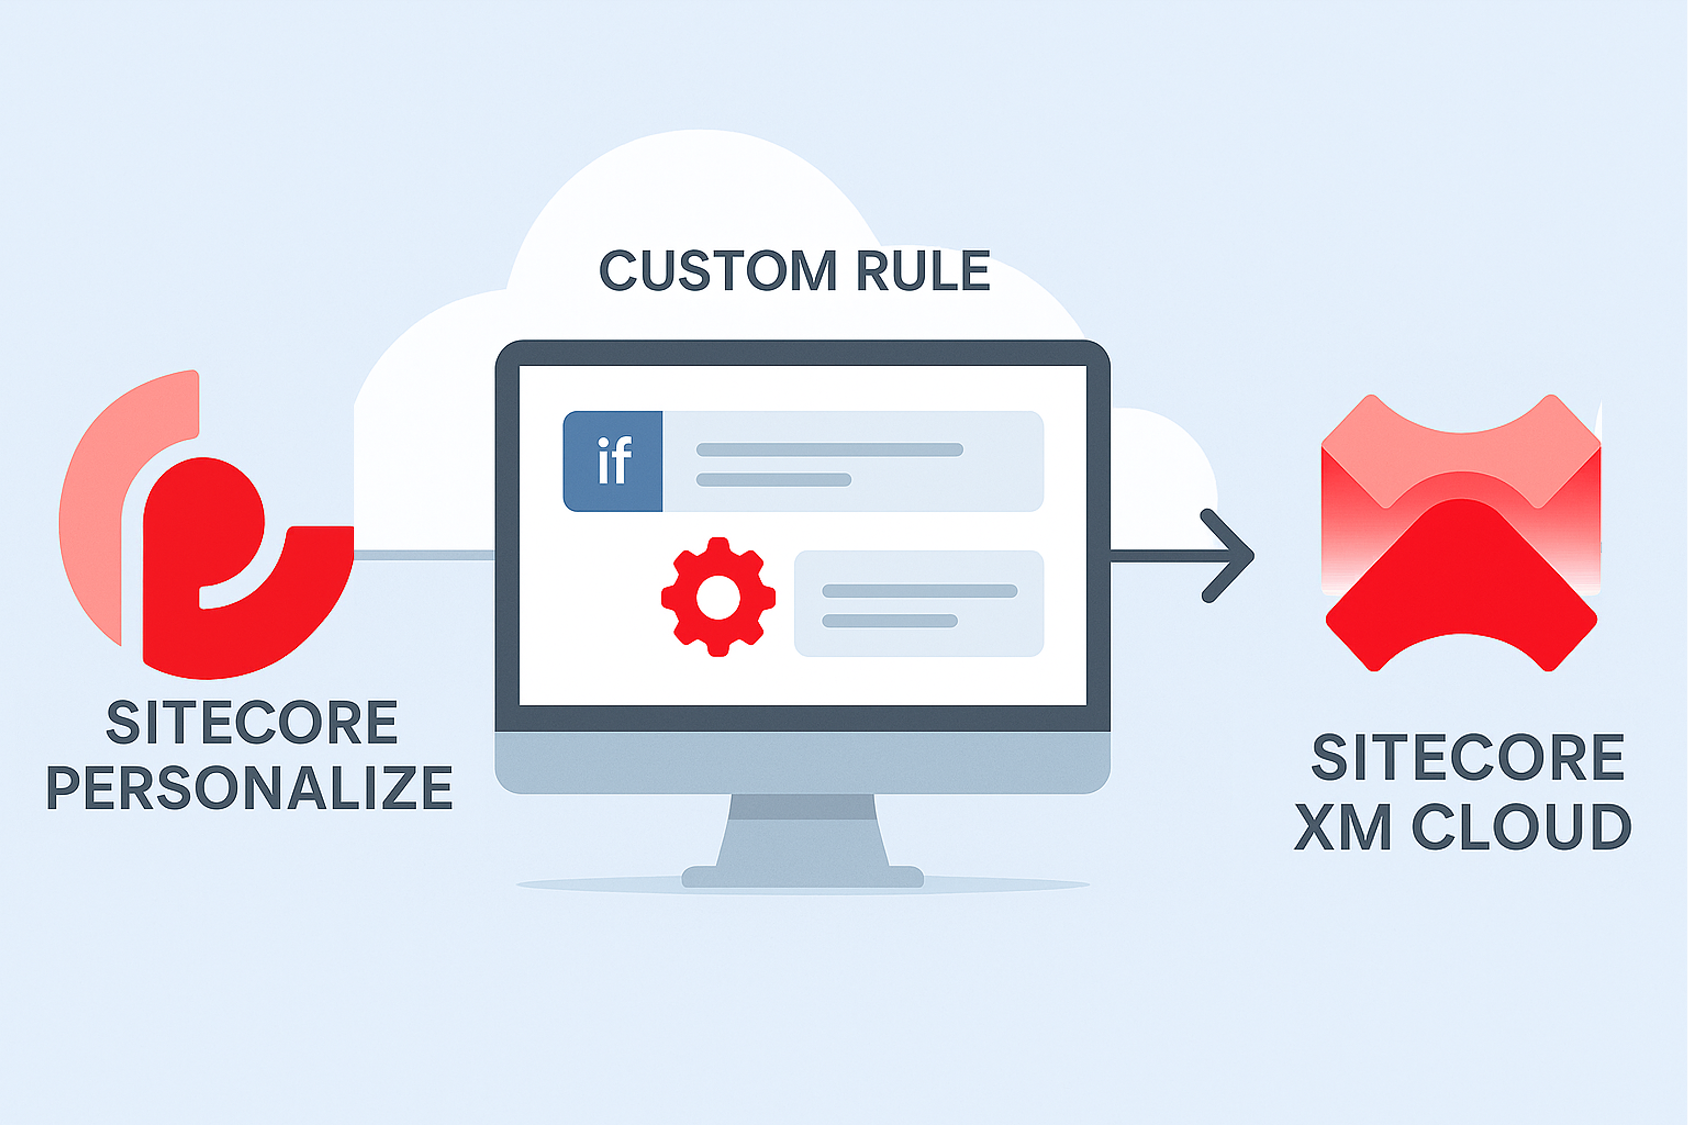
How to Create a Custom Rule for Sitecore XM Cloud in Sitecore Personalize
With Sitecore’s move to composable and disintegrating the Digital Experience stack, Sitecore created an experience that was more malleable, but also potentially created duplicate work. One such instance is the concept of Personalization rules.
In Sitecore XP, you could create Personalize your components and content within it by simply selecting one of nearly 100 Personalization Condition/Action combinations. You could also create your own Sitecore XP conditions and actions. In doing so, you could personalize the experience for a user coming to your website using content, components, logic, and user data that already exists in Sitecore without duplication of any of these efforts.
When Sitecore moved towards Sitecore Personalize, though it allowed greater scalability that Sitecore XP, this simple integration didn’t exist. You were faced with the choice of either creating a duplicate component in Sitecore Personalize from the one that existed in Sitecore XM Cloud/Sitecore XM or bringing in the content via a complex decision model into Sitecore Personalize as the rule is evaluated. Either of these solutions removed the elegance of the Sitecore XP solution to Personalization.
This year, however, Sitecore released an integration between Sitecore XM Cloud and Sitecore Personalize that takes it beyond what existed in Sitecore XP. Now, you can use the 10 or so out-of-the box rules that exist in Sitecore XM Cloud to Personalize or if you also license Sitecore Personalize, you can manipulate these out-of-the-box conditions or create your own custom ones that can be exposed in Sitecore XM Cloud. In this way, you can go back to the Sitecore XP model, using components/content/logic that already exists in Sitecore XM Cloud without duplication, but also create and extend conditions in Sitecore Personalize, using the power of decision models and potentially also the data in Sitecore CDP.
How to Create a Custom Condition in Sitecore Personalize
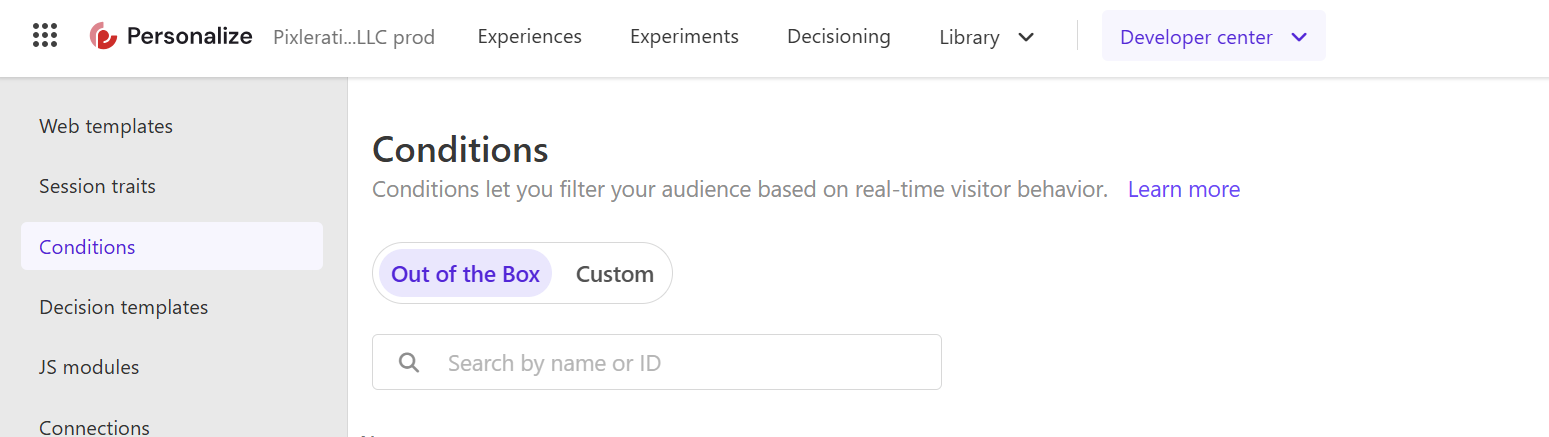
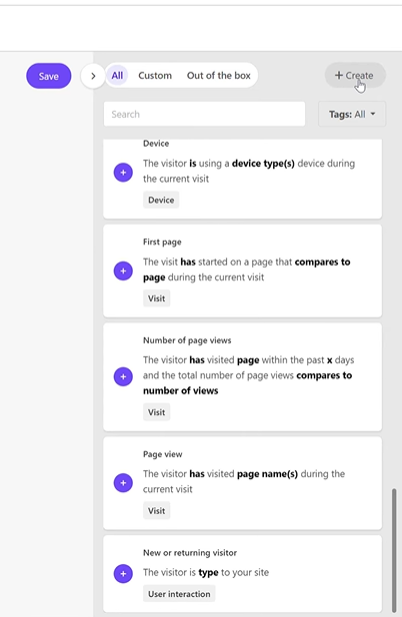
Conditions in the Developer Center: Sitecore Personalize
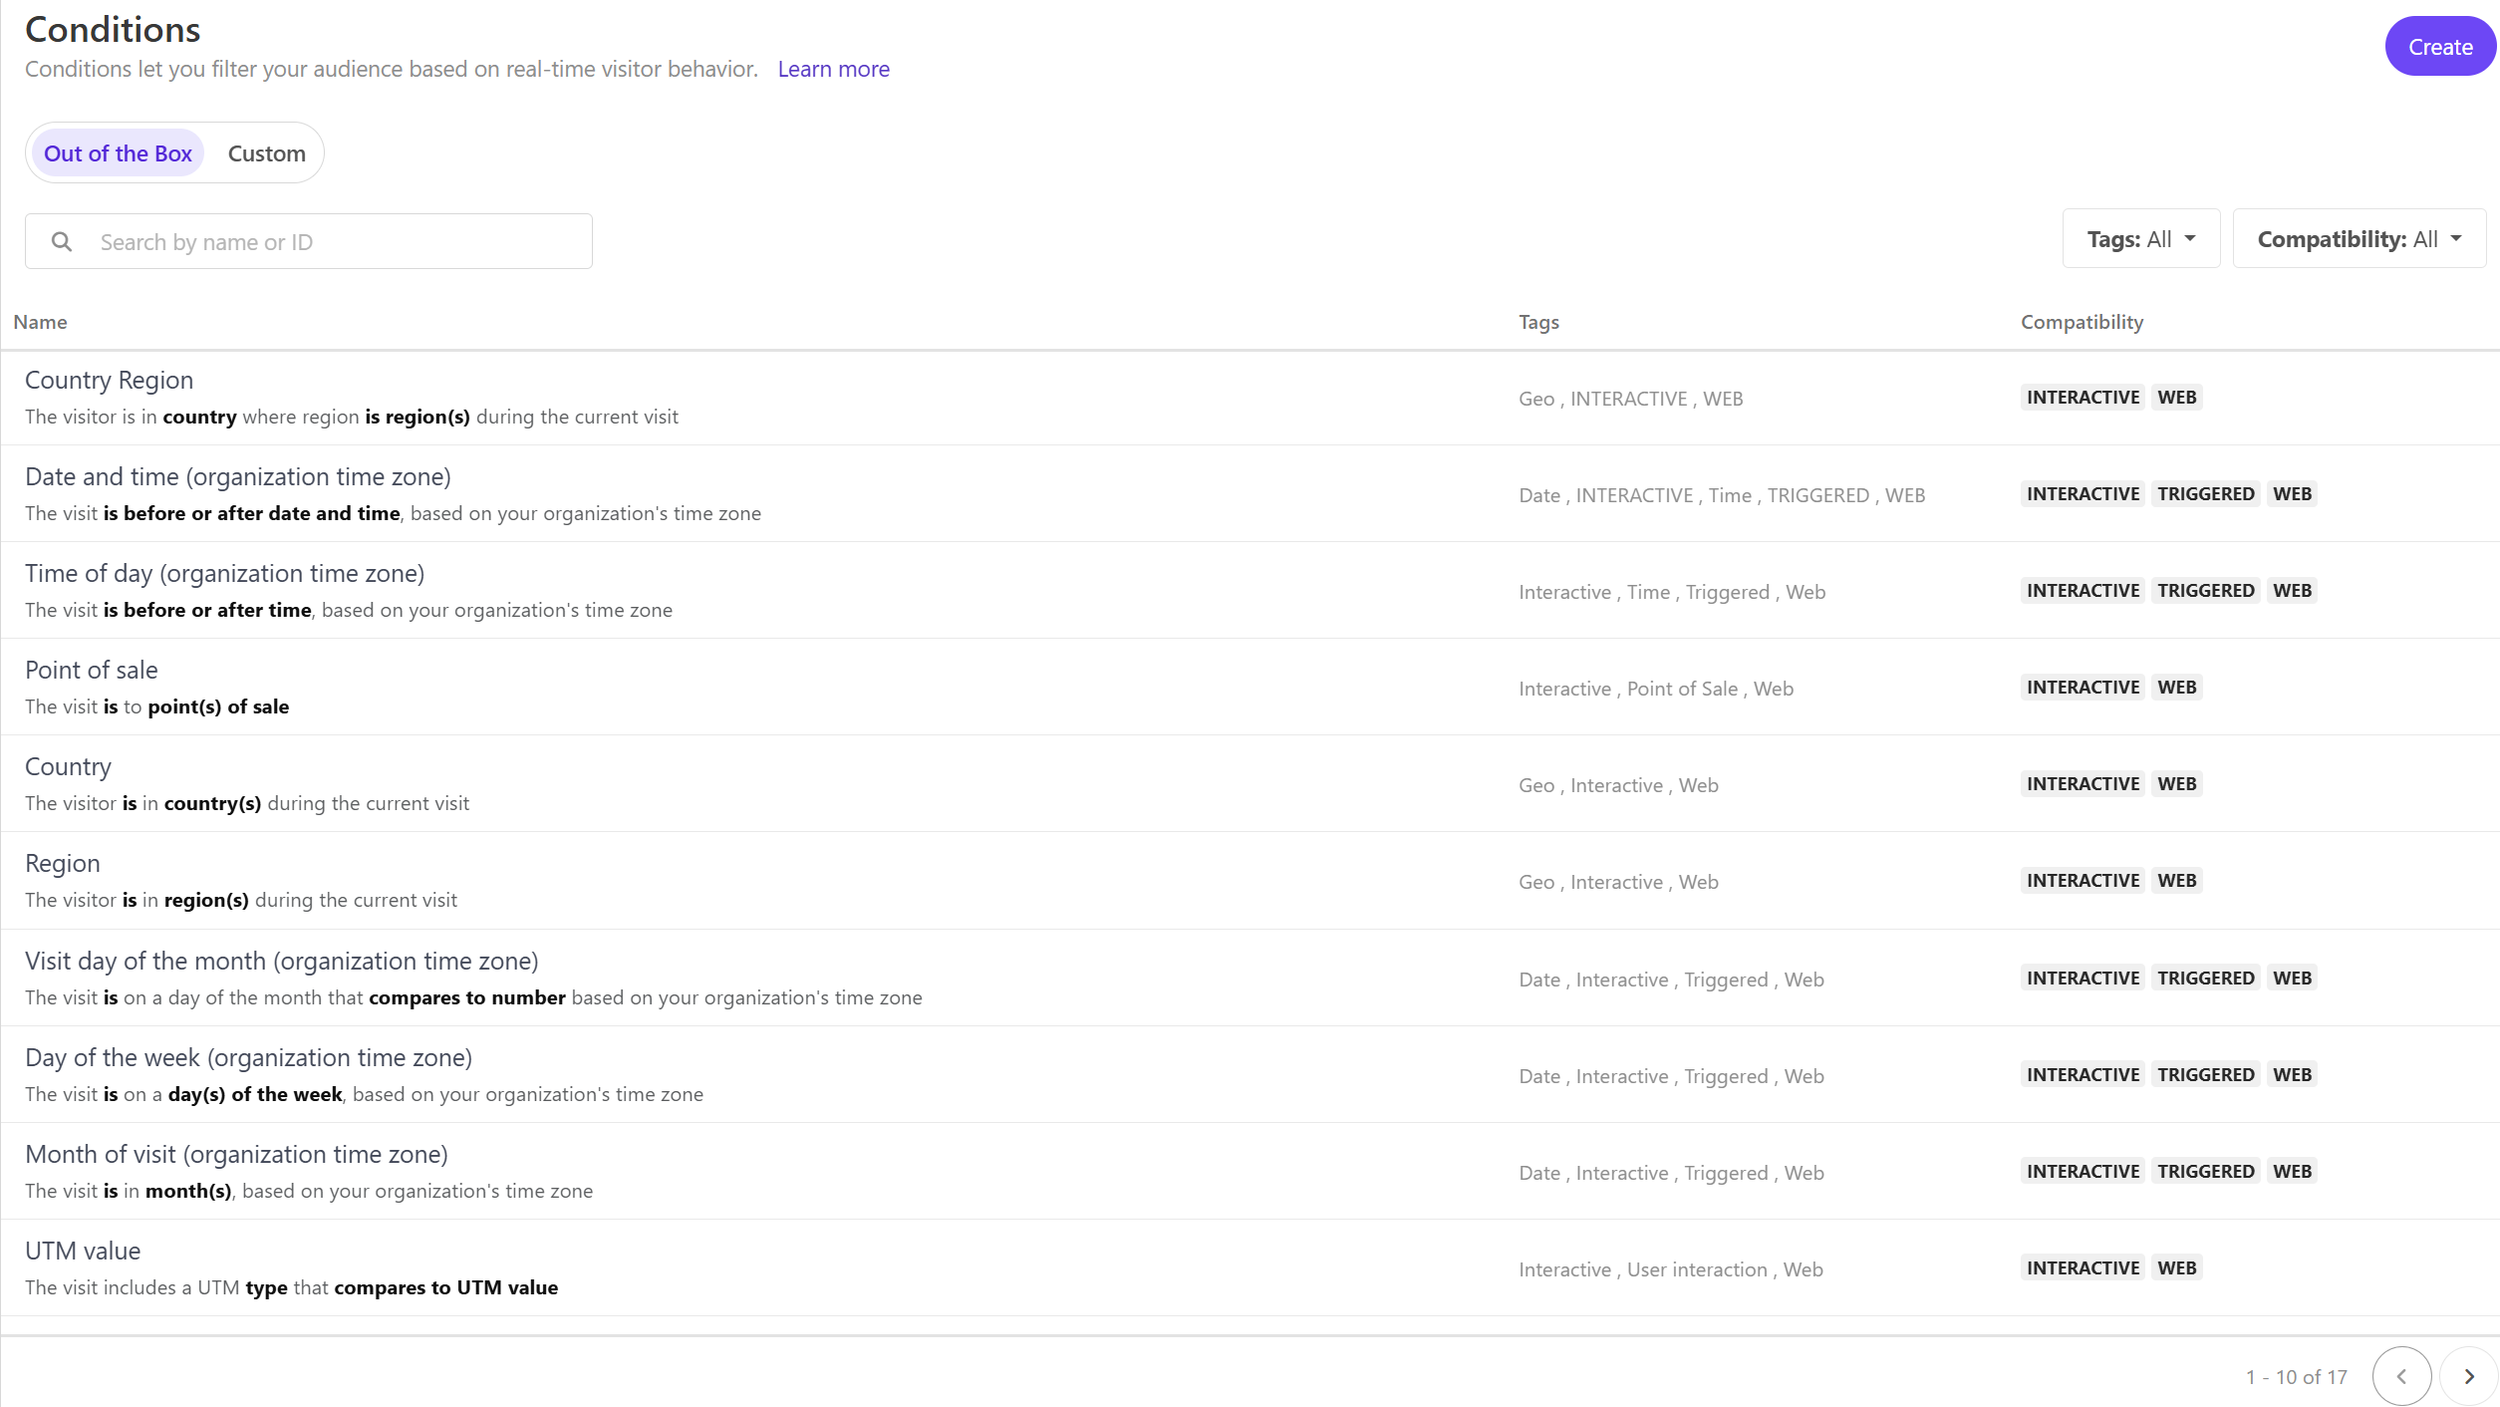
Out of the box conditions in Sitecore Personalize available in Sitecore AI (XM Cloud)

Javascript for Sitecore Personalize Condition
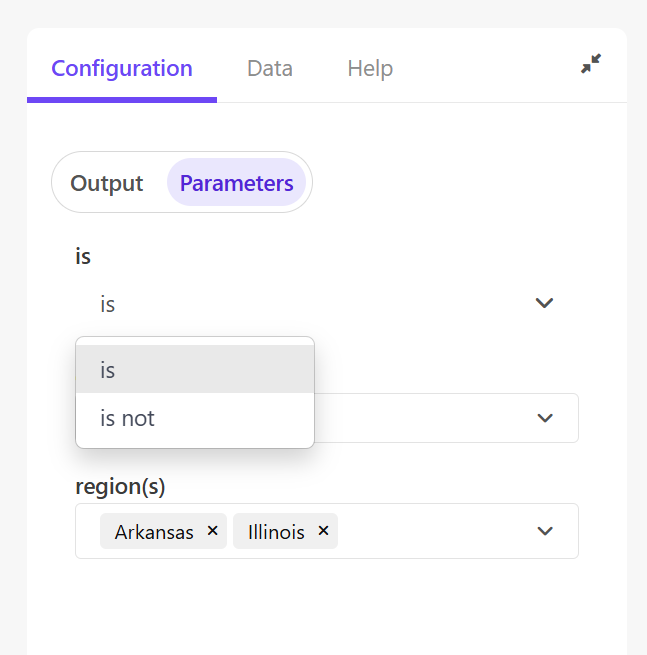
Parameters for Conditions in Sitecore Personalize
Find “Conditions” in the “Developer Center” of Sitecore Personalize
You can either duplicate and edit one of the existing 17 out-of-the-box conditions or create you own custom condition
Use Personalize Javascript function with a true/false output to create your condition
You can use “Code Assistant” with Stream AI to generate prompts for the custom code conditions
Use the following notation [[parameter name]] within the code to automatically generate parameters that the user can fill out
Parameters can be required with a {required: true} notation
Parameters can have options with a {values: [option 1, option 2] notation
Parameters can allow you to select multiple options with a [[Region(s) | multienum(Africa, North America, Oceania, Asia, Europe, South America) ]] notation
You can also configure number only parameters with [[Age | number]] notation
These automatically generate in the “Configuration” > “Parameters” area in the right panel
You can access the data in CDP/Personalize especially the guest context within the condition code
How to Use Sitecore Personalize’s Code Generation for the Condition
Sitecore Personalize integrated with Sitecore Stream AI can generate the Javascript code for the custom conditions. Like all AI engines this simply requires a prompt. See the example in the screenshot below for Javascript to create a condition for a new user where the current page is the landing page, and the user is showing exit intent. This opens up a world to super users who can read and understand Javascript without needing to write each condition or understand the syntax to the level of a developer.

Code Assistant for New user, where the current page is the landing page, and the user is showing exit intent to reduce your bounce rate
How to Use that Condition in Sitecore AI (XM Cloud)
To use custom conditions in Sitecore AI (XM Cloud), you must first integrate your Sitecore AI (XM Cloud) instance and Sitecore Personalize.
How to Integrate Sitecore AI (XM Cloud) with Sitecore Personalize
Integrate Sitecore AI/XM Cloud via the Sitecore Cloud SDK, using the link: https://doc.sitecore.com/sdk/en/developers/latest/cloud-sdk/install-and-initialize-the-cloud-sdk.html
Install the Personalize package using the following link: https://doc.sitecore.com/sdk/en/developers/005/cloud-sdk/cloud-sdk-personalize.html
Finally, ensure you have initialized Sitecore Personalize: https://doc.sitecore.com/sdk/en/developers/005/cloud-sdk/cloud-sdk-personalize-browser-addpersonalize.html
How to see your Custom Conditions in Sitecore AI (XM Cloud)
You can create your conditions/access the screen above directly from Sitecore XM Cloud, using the Create button as well as view your Custom vs Out of the box conditions. When you go to Personalize a page > Create a new page variant > Edit Audience, you will see the list of rules similar to what you see in Sitecore Personalize and can select the rule and input the parameters to create your page variant in Sitecore AI (XM Cloud).
Sitecore Personalize Rules inside Sitecore AI (XM Cloud)
To learn more on how to do this follow my video here on Youtube: Personalizing with Sitecore AI (XM Cloud) and Sitecore Personalize
How to Test the Condition
It’s important to test your new conditions in both Sitecore Personalize and Sitecore AI (XM Cloud).
Testing in Sitecore Personalize
In Sitecore Personalize, you are able to test the condition using a specific guest and their context. Click on “Test” once you’ve saved your rule and before you “Publish” it. You can try out different values for the parameters and different guests, especially if you are using guest context. Click on the Response tab to view the result of the condition, generally either true or false.
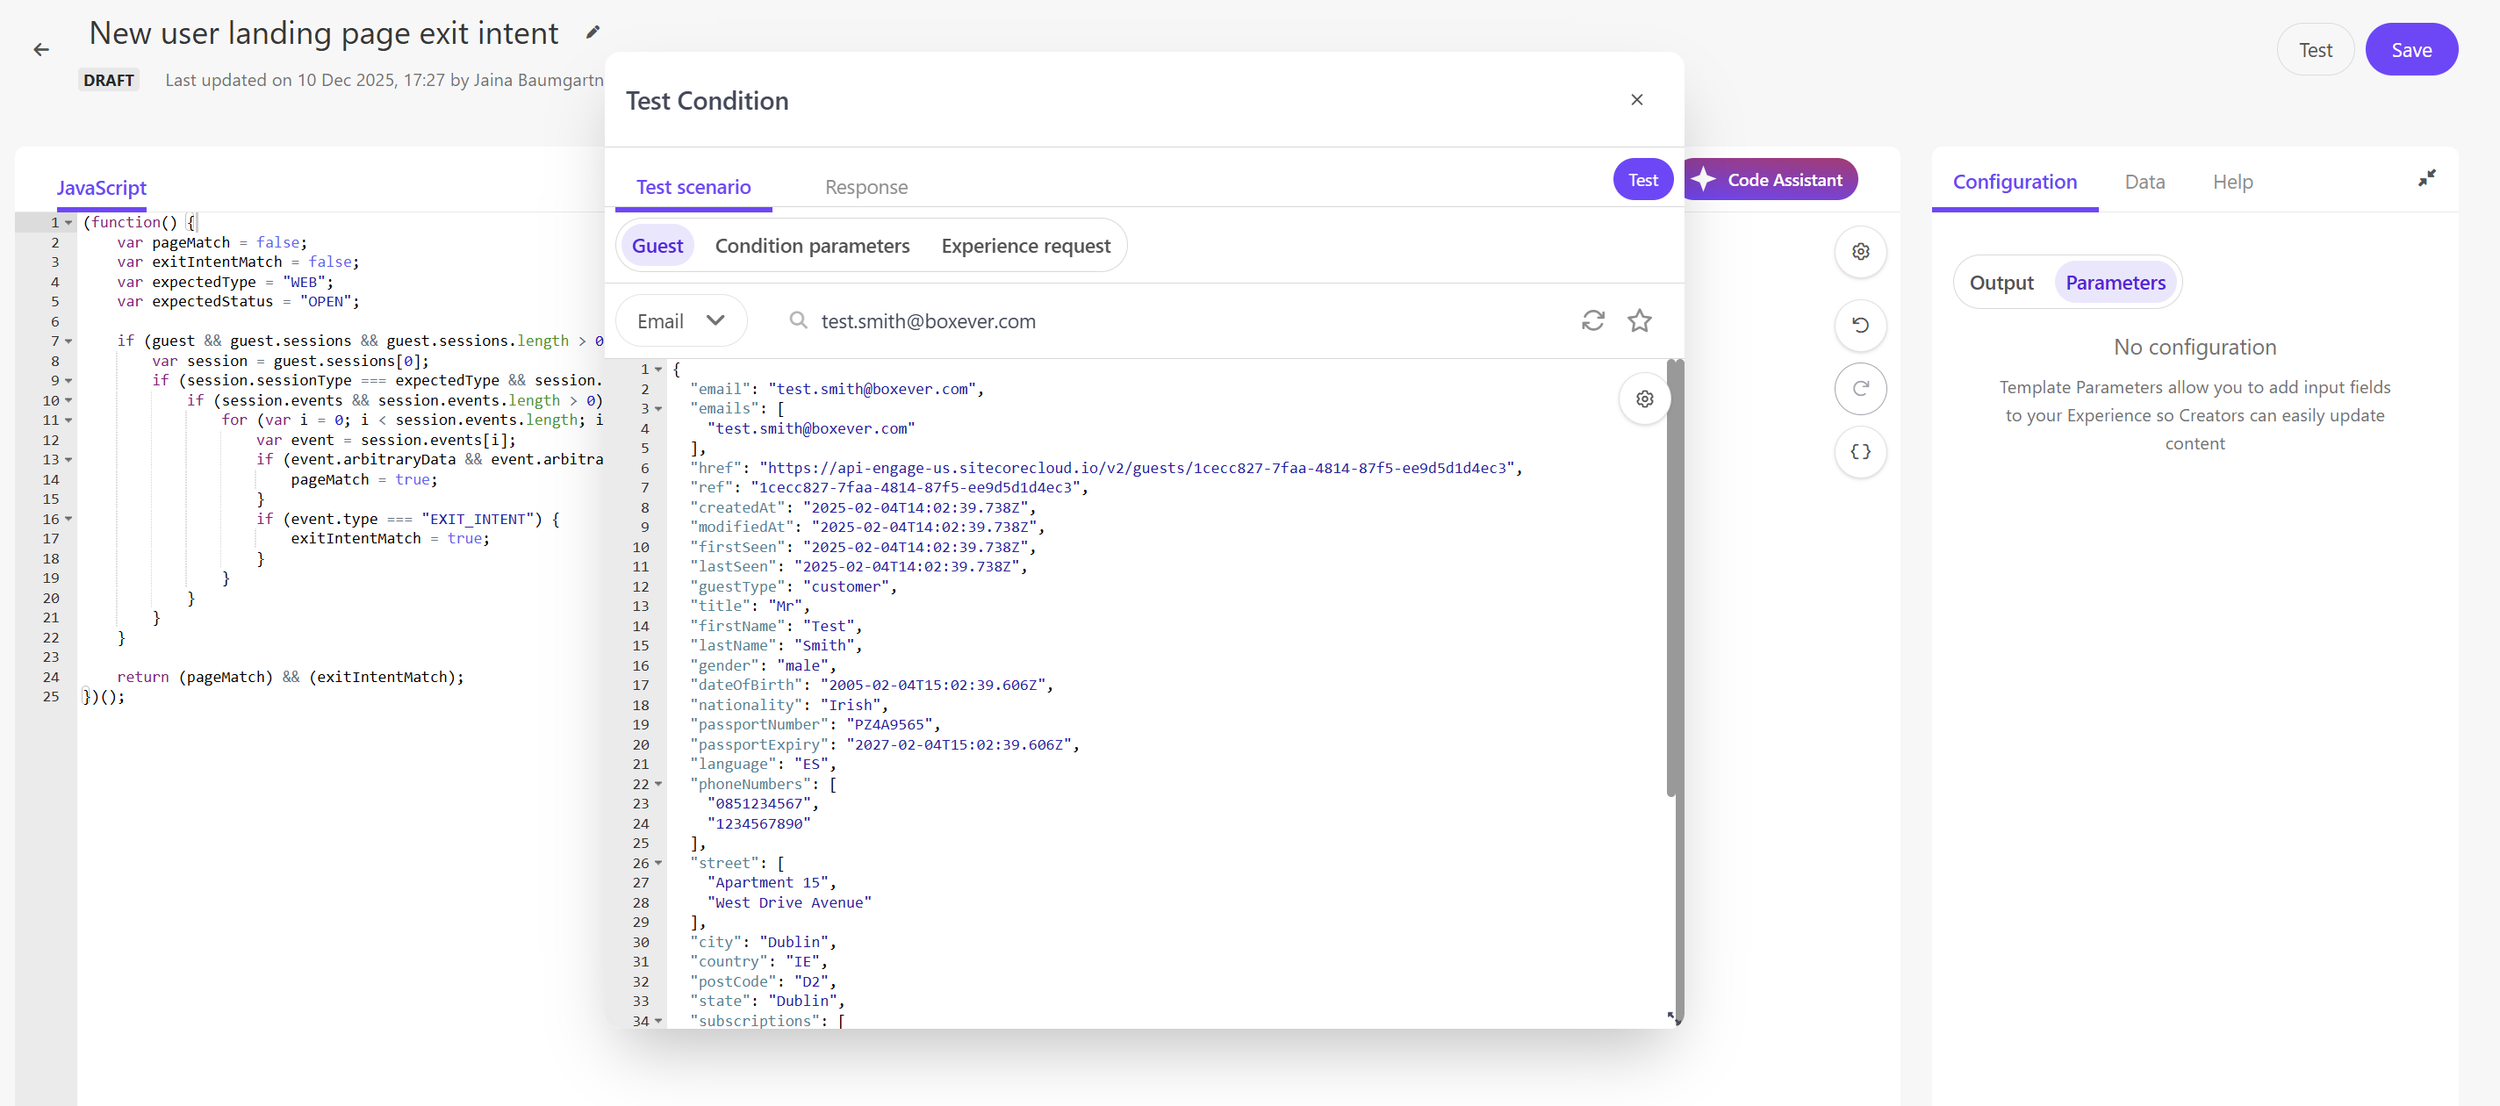
Testing a Custom Rule in Sitecore Personalize
Testing in Sitecore AI (XM Cloud)
View the experience in Sitecore AI (XM Cloud) by clicking on the variant and previewing the page, ensuring that the current components are personalized.

Previewing Personalized component in Sitecore AI (XM Cloud)
Beyond that, you can always add ?bxQATool=true querystring parameter to your website address to pull up the Personalize QA tool, and try out different guests and see their experiences.
How to View Analytics for the Condition in Sitecore AI (XM Cloud)
Compare variants in Sitecore AI (XM Cloud) Analytics and Dashboard. Select the variants (personalizations) you want to compare to see how they perform against each other in Sitecore AI (XM Cloud).
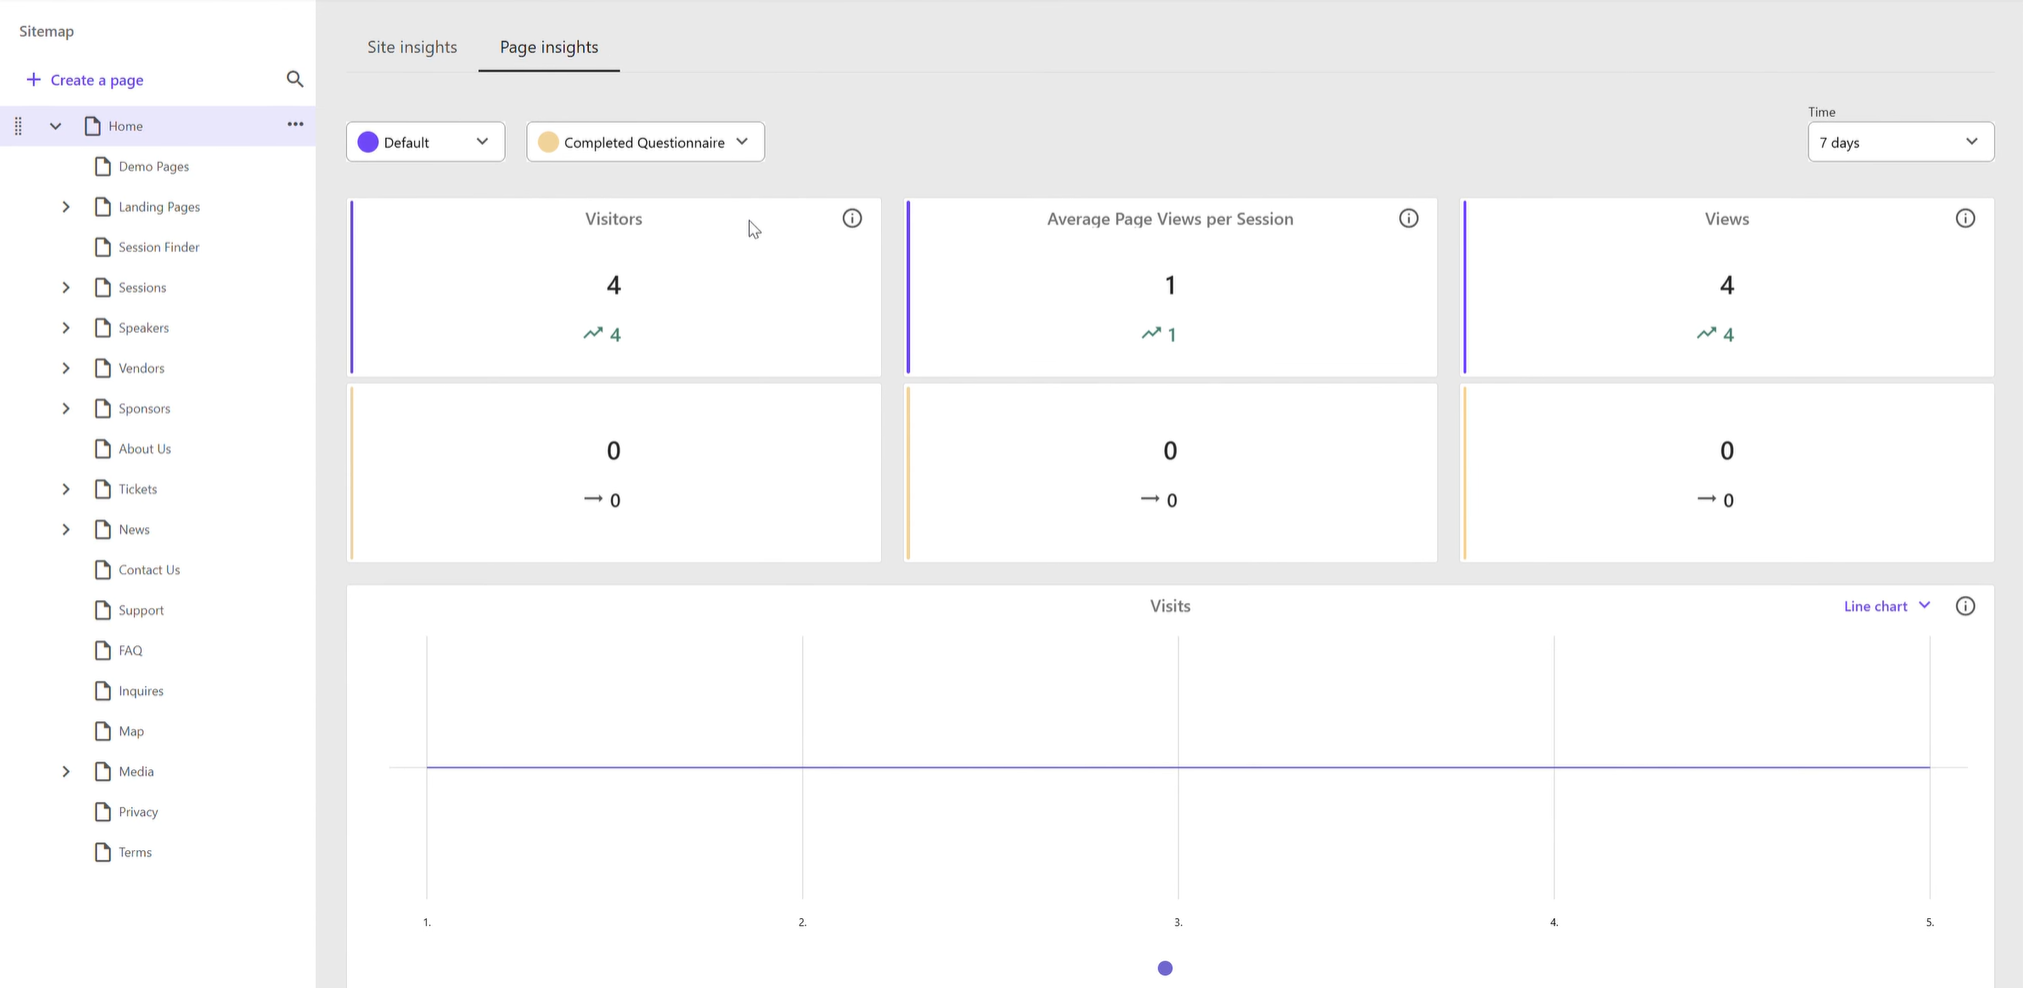
Sitecore AI (XM Cloud) comparison of variants (personalization) in Analytics
Conclusion/Summary
Sitecore has brought back the integration of Content, Design, and Personalization, avoiding duplicates of each with this integration of Sitecore AI (XM Cloud) and Personalize. Additionally, the data in CDP, the efficiency of AI, and scalability of Sitecore Personalize has made this model far superior and feature rich than XP ever was. There are still features of Personalize that are not available in this integration, such as tracking specific KPIs, component based personalization, and split testing with statistical significance and confidence, but Sitecore has taken large steps towards becoming an integrated Digital Experience Platform.


